This is the early access documentation preview for Custom Views. This documentation might not be in sync with our official documentation.
Using redirects
The Redirects area lets you manage redirects for your website.
The Redirects area helps you create redirects to avoid dead links across your website or to avoid displaying old pages to your customers.
For example, if you created the /sale-2021 page and now you don't want your customers to find this page, you can create a redirect from the /sale-2021 page to the /sales page.
You can only create redirects from page folders that no longer exist. To create a redirect from an existing page folder, you can use a client side redirect component.
Create a redirect
To create a redirect, follow these steps:
From the Studio home page or from the left navigation menu, go to Redirects.
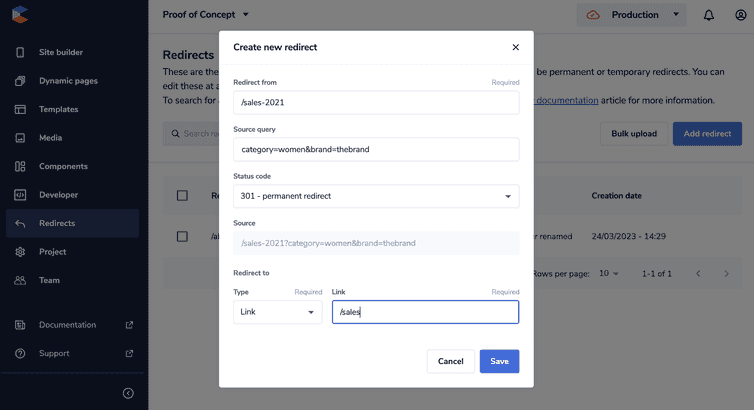
Click Add redirect: the Create new redirect dialog opens.
In the Redirect from field, enter the URL of the page or the path of the page folder to redirect from.
The path of the page folder must start with
/(for example,/sale-2021).
Enter the path of a deleted page folder. Do not use the path of an existing page folder.If necessary, in the Source query field, enter query parameters for the source path you entered in the Redirect from field. Enter the parameters with the
query=foo&otherQuery=barpattern.
For example, if you entercategory=women&brand=thebrandas query parameters and the source path is/sale-2021, the redirect will be set for/sale-2021?category=women&brand=thebrand.From the Status code drop-down, select the HTTP status code for the redirect.
From the Type drop-down, select the type of redirect. Depending on the type of redirect, the next field changes.
Do one of the following:
In the Link field, enter the internal link to the dynamic page or the URL of the external page to redirect to.
The internal link must start with
/(for example,/sales).
The URL must start with the protocol (for example,https://example.com/page/to-redirect-to).From the Target page folder drop-down, select the page folder in the Site builder to redirect to.
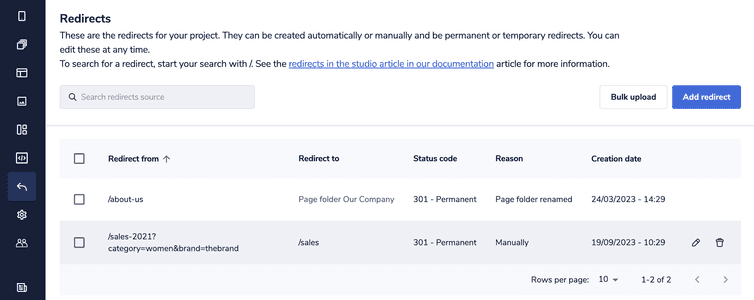
Click Save: the redirect is displayed in the redirect list.
Edit a redirect
To edit the settings of a redirect, follow these steps:
In the Redirects area, search for the redirect in the list.
Hold the pointer over the redirect and click the Edit icon.
Apply the changes, then click Save. In the redirect list, the redirect is saved with Reason set to Edited.
Delete a redirect
To delete a redirect, follow these steps:
In the Redirects area, search for the redirect in the list.
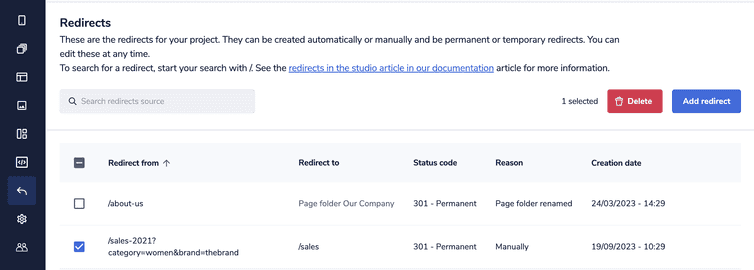
Do one of the following:
In the Delete redirect? dialog, click Delete.
Search redirects
To search a redirect, use the search box in the Redirects area. In the search box, enter your search text starting with a /. For example, /sale-2021.
Add bulk redirects
When moving to commercetools Frontend from other tools, it is possible to add bulk redirects to your project by uploading a CSV file.
To upload the CSV file, follow these steps:
From the Studio home page or from the left navigation menu, go to Redirects.
Click Bulk upload: the Bulk upload redirects dialog opens.
Click Add .CSV file and select the file to upload.
Click Validate and upload redirects. If the file meets the CSV file requirements, the redirects will be added to your commercetools Frontend project with the type Migration.
Otherwise, an error message will appear prompting you to fix the problem encountered.
CSV file requirements
The CSV file must include the source path and the target path in the following format:
/page/to/redirect-from;https://example.com/page/to/redirect-to
For example, /perfume?brand=perfume%20brand;https://yourwebsite.com/perfume/perfume-brand.
URLs must not contain spaces or special characters.
The CSV file must meet the following requirements:
- The file must contain up to 500 lines.
- The file must contain only redirects. For example, do not include a row header.
- The file must use UTF-8 encoding.
- Paths must start with
/. - The delimiter character must be
;. - If needed, the enclosure character must be
"and the escape character must be\.
Redirects work on paths, not on the domain. It's possible to have different redirects based on language only if they are on different paths. For example, the source /socken redirects to /de/socken and /socks redirects to /en/socks.


