This is the early access documentation preview for Custom Views. This documentation might not be in sync with our official documentation.
Import
Import Category data and monitor the status of import activities.
Import-related functionality and the Import API are only available in Google Cloud Regions.
Import from CSV file
Merchant Center lets you perform bulk data import by uploading data from a CSV file.
To import data from a CSV file in Merchant Center, the Administrators Team must grant the View and edit all: Operations permission to your respective Project and Team.
Currently, you can only import Categories.
CSV file requirements
Click here to download an template CSV file for importing Category data.
When creating a CSV file, the following headers and values are supported:
| Header | Value |
|---|---|
key | Unique identifier of the Category to create or update. This must only include letters, numbers, underscores (_) or dashes (-). A key must always be included. |
name.en | The name of the Category. Must be included when creating a new Category. |
slug.en | The slug for the Category. Must be included when creating a new Category. |
description.en | A description of the Category. |
externalId | An additional identifier for the Category (for example, if the Category exists in external systems). |
metaTitle.en | The name of the Category for search engines. |
metaDescription.en | A description of the Category for search engines. |
metaKeywords.en | Keywords related to the Category for improved search engine performance. |
parent.key | If this is a child Category, this is the key of the Category to use as the parent. A Category with this key must exist before importing. parent.key is required when updating a child Category. |
parent.typeId | Must be included when parent.key has a value. The value must always be category. |
custom.type.key | Key of a Type to reference in a Custom Field. |
custom.type.typeId | Must be included when custom.type.key has a field. The value must always be type. |
custom.fields.nameOfCustomField | Replace nameOfCustomField with the name of the Custom Field as defined in the respective FieldDefinition. The value must conform to the FieldType of the Custom Field. |
For headers that end with .en, you can change en to reference another language. You can also include this header multiple times to include values for different languages. For example, including the header name.de allows you to include a German name, and name.en-US allows you to include an American English name.
The CSV file must not be larger than 10 megabytes and must contain fewer than 5000 rows.
Importing Custom Fields
All Custom Fields except number, reference, and sets are supported.
When importing LocalizedString Custom Fields, you must include headers and values for each language. For example: custom.fields.nameOfCustomField.en and custom.fields.nameOfCustomField.de for English and German respectively.
Money Custom Fields require four headers and values:
| Header | Value |
|---|---|
custom.fields.nameOfCustomField.currencyCode | Currency code compliant to ISO 4217. For example, USD, EUR, or GBP. |
custom.fields.nameOfCustomField.centAmount | The number of cents in the currency. |
custom.fields.nameOfCustomField.type | The value must always be centPrecision. |
custom.fields.nameOfCustomField.fractionDigits | The number of digits after the decimal separator. |
Upload a file
Go to Operations > Import, and click the Upload files tab.
Select the resource type from the drop-down, and upload the respective file. You can either drag the file into the input box, or browse and select the file from your local machine.
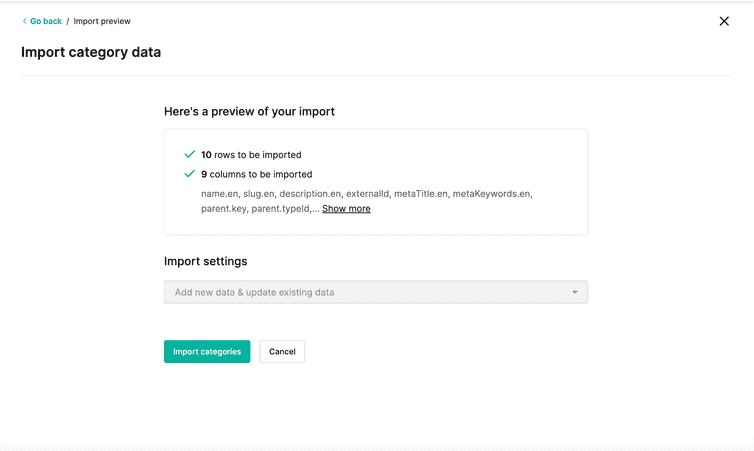
Verify the information after the file is uploaded and validated successfully, and click Import categories. To monitor the import progress, click the Import logs tab. For more information on the import log, see Import logs table.
You can also upload another file simultaneously while the import operation is running.
Import logs
To access Import Logs in Merchant Center, the Administrators Team must grant the View all: Operations permission to your respective Project and Team.
Import logs are historical records of all your import activities performed in the last 48 hours using the Merchant Center or Import API. It helps you track the import progress, and check errors and pending actions in Import Containers.
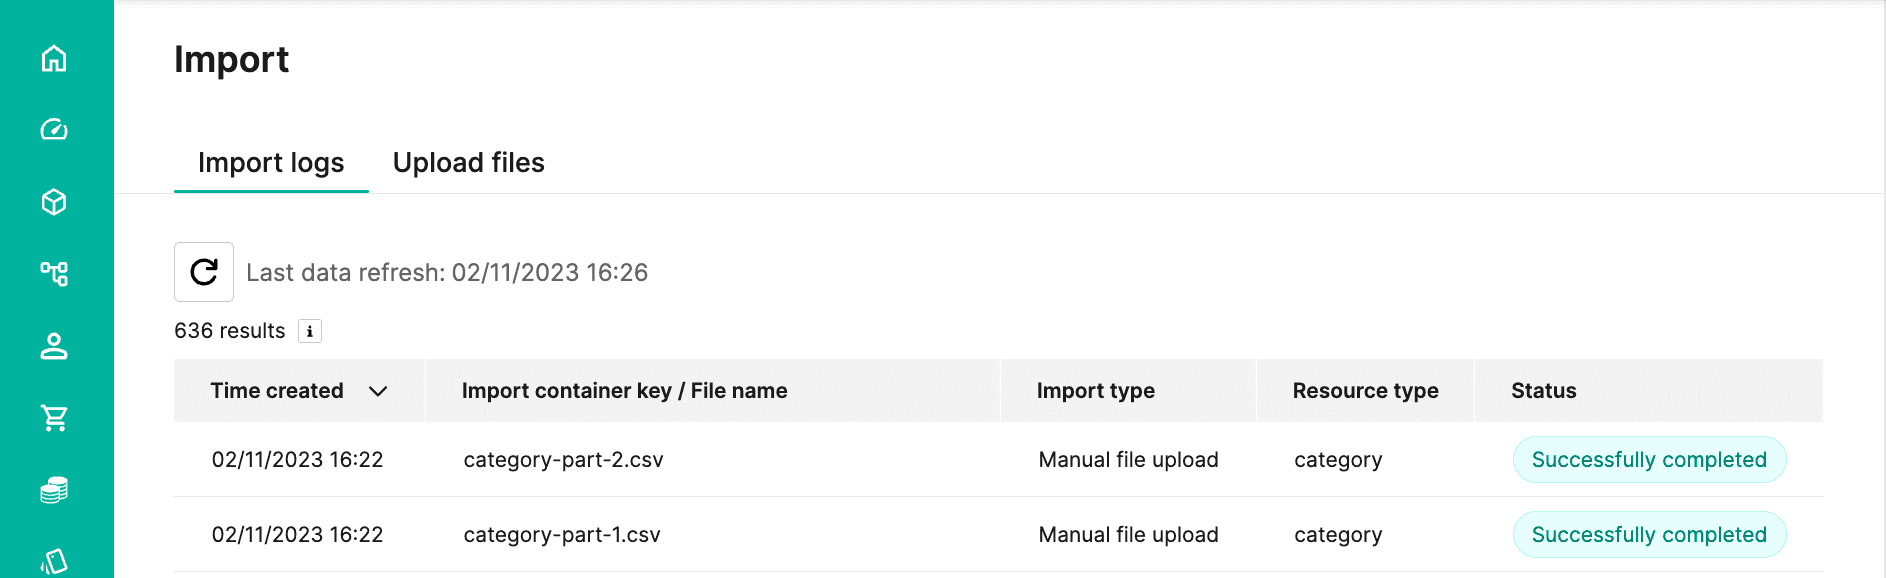
To access the import logs, go to Operations > Import and click the Import logs tab. The import logs table is generated when the page is loaded. To update the visible data thereafter, click the refresh button.
The import log table has the following columns:
- Time created: date and time the import container was created.
- Import container key / File name: name or unique key of the import container.
- Import type: indicates the method of data import:
- Automated import: imported using the Import API.
- Manual file upload: imported from a CSV file.
- Resource type: resource type provided at the time of the import container creation.
- Status: import status of an import container:
- Successfully completed: all resources were successfully imported.
- Partially completed: some import operations were successful while others are in
FailedorUnresolvedstates. - Failed: all import operations were unsuccessful.
- Processing: some import operations are still in progress.
- Wait for unresolved references: some import operations are
Unresolvedand are awaiting missing or undefined references. - Canceled: the import operations were manually terminated. Resources imported before cancellation were not removed.
- No running imports: the import container has no running or waiting import operations.
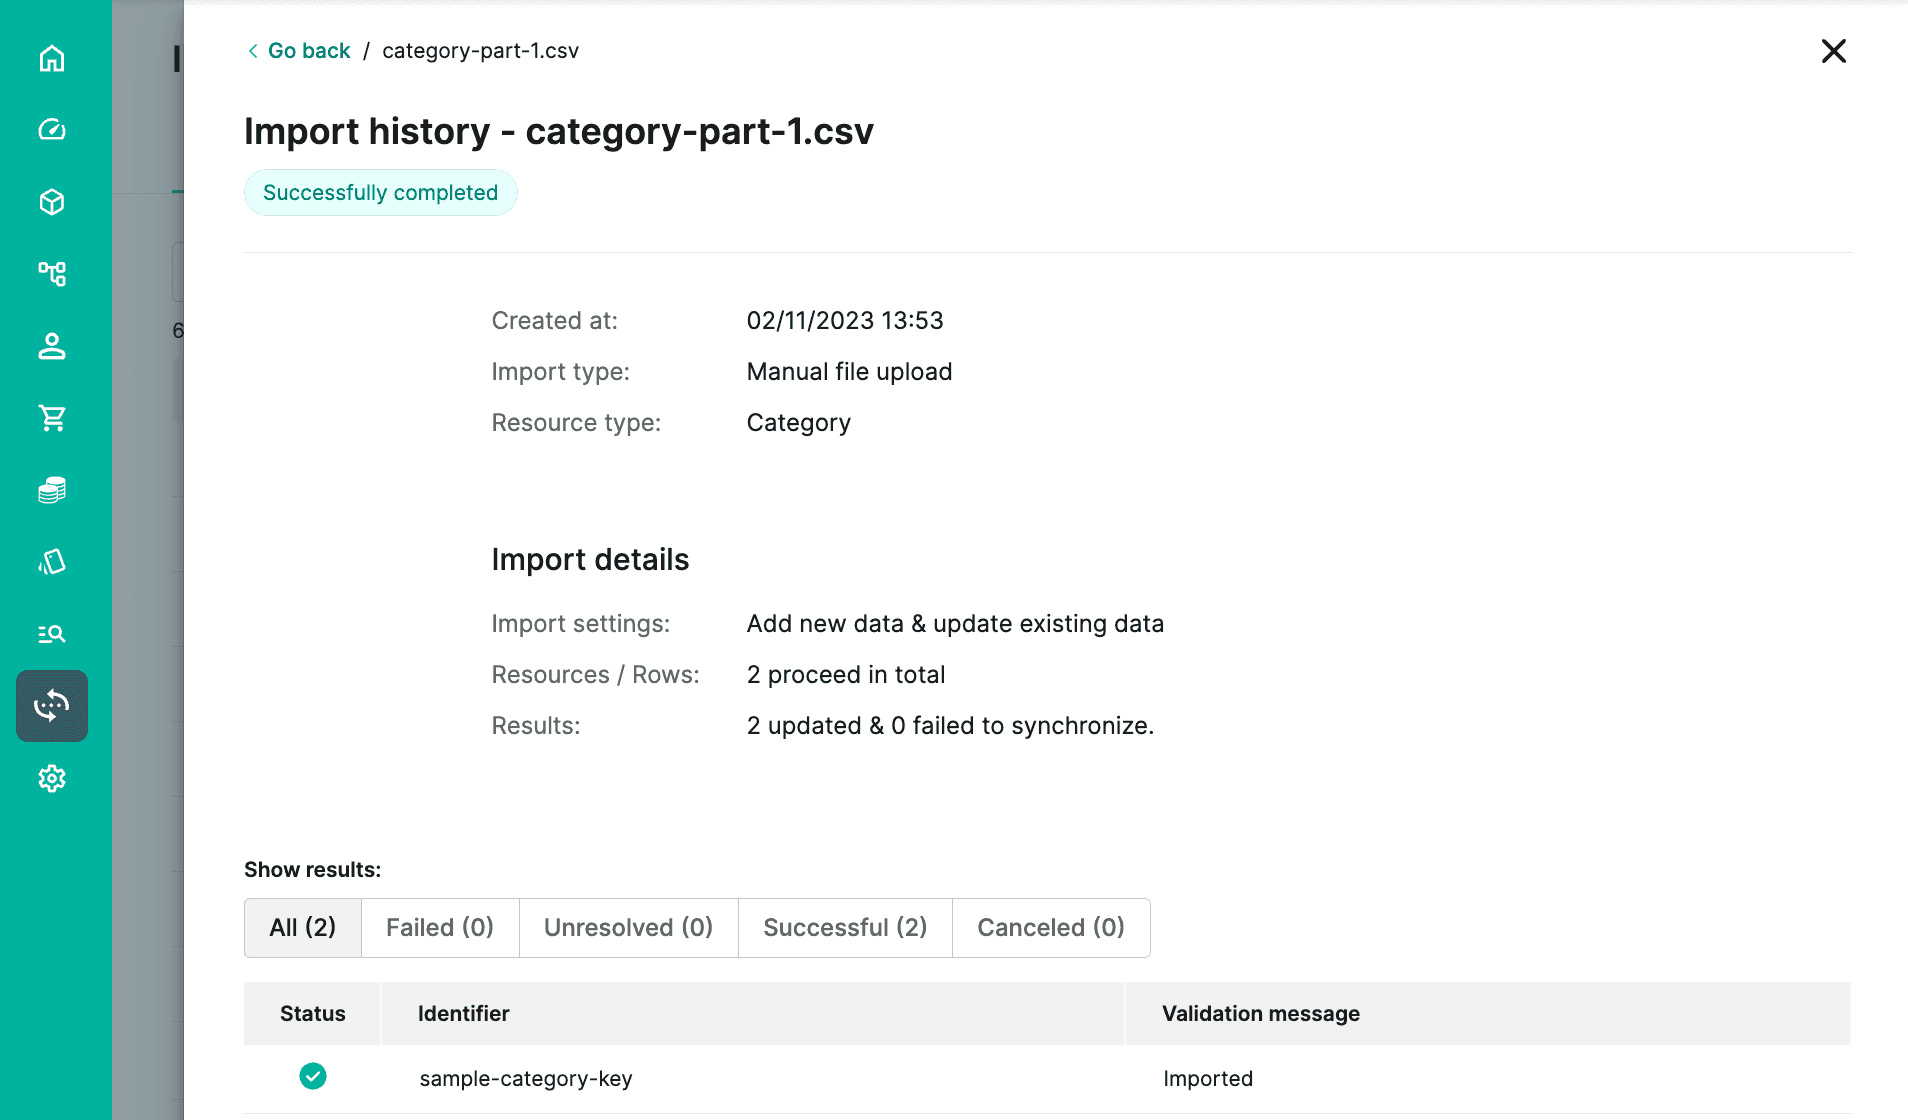
History of an Import Container
To view individual import request items or operations of an Import Container, click the corresponding row in the import logs table. The operations are uniquely identified by resource key and the table displays the following details:
- Status: symbolic representation of an import operation's status:
- Red indicates a
Failedoperation. - Blue indicates an operation in progress or waiting.
- Green indicates a
Successfuloperation.
- Red indicates a
- Identifier: unique identifier of an operation.
- Validation message: placeholder for the details of the import status that displays the detailed error, required action, or success message.